Managing Funds
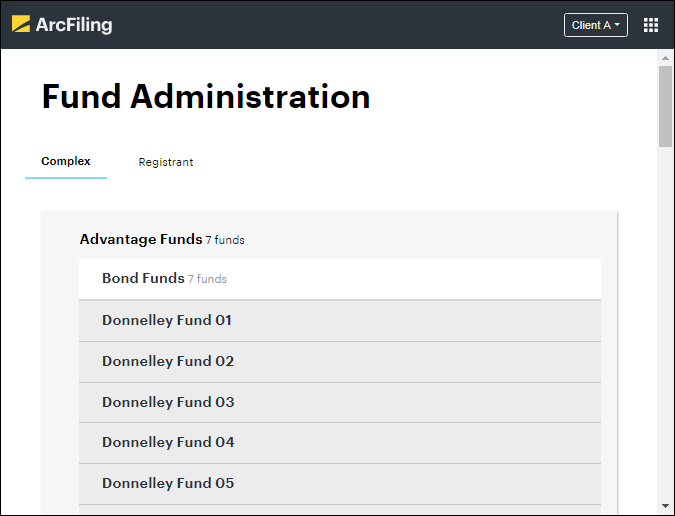
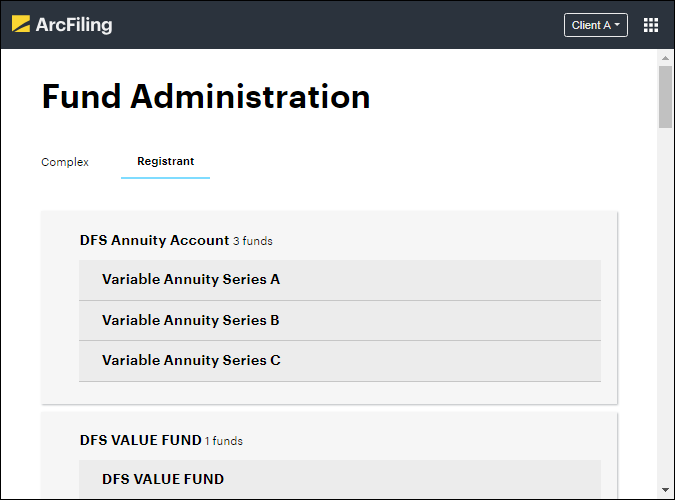
Clicking the “Manage Funds” link in the “Client Administration” area opens the “Fund Administration” screen. Here, you can manage registrants, complexes, fund groups, fund hierarchy, associated parties and expected data sources for funds.
- The “Complex” tab displays a listing of all funds, grouped by complex, then by fund group.
- The “Registrant” tab displays a listing of all funds, grouped by registrant. You can expand the entity nodes on either tab to find the information you’re looking for and make any necessary updates.
Complexes, Fund Groups and Funds
Click a complex name on the “Complex” tab to expand and view its associated fund group listing. Click a fund group name to expand and view its associated fund listing.

You can edit the details of any given complex, fund group or fund by carrying out the steps outlined below.
-
Click the “Edit” button at right of the item.
-
You can update a complex’s properties via the corresponding fields that display on the “Overview” tab.

Complex “Overview” tab -
Click the “Chart Of Accounts” tab to view and manage the charts of accounts associated with any given complex, and which are available to its funds.

Complex “Chart Of Accounts” tab -
To view and/or edit the definition of any existing chart template, click the item in the listing that represents it.

Complex “Chart Of Accounts” tab detail - Update the template name via the associated field on the tab, as needed.
-
To add a question to the template, click in the “Search for questions” box, and then select from the listing that displays.
You can filter the list of questions by typing a key word or string in the box.
-
The following questions may be added to a chart template:
- B.1.a - Total Assets
- B.1.b - Total Liabilities
- B.1.c - Net Assets
- B.2.a - Assets attributable to miscellaneous securities
- B.2.b - Assets invested in controlled foreign corporation
-
B.2.c - Borrowings attributable to amounts payable
-
Within One Year
- Banks Borrowed
- Controlled Companies
- Other
- Other Affiliates
-
After One Year
- Banks Borrowed
- Controlled Companies
- Other
- Other Affiliates
-
- B.2.d - Payables for investments purchased on a delayed delivery
- B.2.d - Payables for investments purchased on a standby commitment basis
- B.2.e - Liquidity preference
- B.6.a - Net Asset Value (Excluding Reinvestment
- B.6.b - Net Asset Value (Dividends and Distributions)
- B.6.c - Net Asset Value (Redeemed or Repurchased)
-
B.5.c - Net realized gain attributable to derivatives for asset categories:
- Commodity Contracts
- Credit Contracts
- Equity Contracts
- Foreign Exchange Contracts
- Interest Rate Contracts
- Other
Within each asset category, you can choose the derivatives instrument used:
- Forward
- Future
- Option
- Other
- Swap
- Swaption
- Warrant
-
B.5.c - Net unrealized appreciation attributable to derivatives for asset categories:
- Commodity Contracts
- Credit Contracts
- Equity Contracts
- Foreign Exchange Contracts
- Interest Rate Contracts
- Other
Within each asset category, you can choose the derivatives instrument used:
- Forward
- Future
- Option
- Other
- Swap
- Swaption
- Warrant
- B.5.d - Change in unrealized appreciation
- B.5.d - Monthly net realized gain/loss
- B.6.a - Net Asset Value (Excluding Reinvestment)
- B.6.b - Net Asset Value (Dividends and Distributions)
- B.6.c - Net Asset Value (Redeemed or Repurchased)
-
-
To add a general ledger account to a given question, click the box at lower right of the item representing that question, and then select from the listing that displays.
A prerequisite to mapping trial balance accounts to each question in a given template is that general ledger data be ingested into the application.
- Click the “Save” button at upper-right of the tab to save any updates you make.
- Click the “x” button at right of a given list item to delete the question and its mapped account(s) altogether.
- To add a chart template in association with a complex, click the “Add New” button at upper-right of the tab (or the “Add One” button, if no templates yet exist).
- Click the “x” button at right of a given list item to delete the chart template altogether.
-
-
Click the “Approvals” tab to view and manage the approval levels and users associated with any given complex.

Complex “Approvals” tab You can define who is responsible for approvals for the complex up to 3 levels (Level 1 being the lowest; Level 3 being the highest).
-
To assign a user to a given approval level, click and drag their name from the right panel of the tab, and drop it in the area beneath the appropriate level at left of the tab.
-
Any user who has at least the “Edit” user role can be assigned as an approver.
- Click the “Edit User Roles” link at upper-right of the tab to switch to the “User Overview” screen and make any necessary changes to user roles.
-
More than one user may be assigned to each approver level, but any given user may only be assigned to one approver level.
-
There is no difference between each of the approval levels. It is up to the client to determine how they want to define each level of approval.
Use the search box at upper-right of the tab to filter the listing of users in view while you’re working.
-
- To remove a user from an approver level, click the “Delete” icon at left of their name, in the area beneath the approver level label.
- Click the “Save” button at upper-right of the tab to save any updates you make.
-
-
Click the “Data Overwrite” tab to view and manage settings pertaining to the effect of ingestion template values on specific holdings data already stored in the database.

Complex “Data Overwrite” tab You can prevent existing holdings values from being overwritten when importing another holdings file using the “Allow Ingestion Overwrites?” check box option. By default, this overwrite option is selected for all fields listed on the tab, and the data will be overwritten if it is present in the load file.
-
Use the “Allow Ingestion Overwrites?” check box option to prevent existing holdings values from being overwritten when importing another holdings file. By default, this overwrite option is selected for all fields listed on the tab, and the data will be overwritten if it is present in the load file.
For new securities, this overwrite specification is ignored altogether, and data from the import file will be loaded.
- If you clear the check box for a specific field, its value will not be overwritten if a corresponding value is present in the load file.
-
Use the “Allow Null Overwrites?” check box option to cause null (blank) values to overwrite the value of any of the fields, if present in the load file. By default, this overwrite option is cleared for all fields listed on the tab.
- If you select the check box for a specific field, its value will be overwritten if a corresponding null value (blank) is present in the load file.
- Click the “Save” button at upper-right of the tab to save any updates you make.
-
-
-
You can update a fund group’s properties via the corresponding fields that display. You can also assign one or more funds to the group by dragging and dropping them from the “All Funds” listing at right of the screen to the listing left, or by clicking the “+” button displayed at left of a given fund.

Fund group “Overview” tab Any funds added to a fund group will be removed from any other existing fund group assignment.
-
You can update a fund’s properties via the corresponding fields that display on the “Overview” tab.

Fund “Overview” tab Charts of accounts available to a given fund for association are defined via that fund’s complex.
-
To deactivate a fund, clear the “Is Active?” check box at lower-right of the tab.
-
Deactivating a fund has the following effects:
- The fund is listed among all other inactive funds at the bottom of fund group and registrant lists.
- The fund name displays in red text, with the term “INACTIVE” next to it.
- All fields on the fund “Overview” tab are disabled (i.e., cannot be edited).
- The fund no longer displays in fund listings in the ArcFiling area of the application.
- You must be assigned the role of “Fund Data Manager” to deactivate a fund.
- Currently, if a given fund has ever been successfully (or unsuccessfully) test or live filed, you cannot deactivate the fund. This restriction will be removed in a future application release.
-
-
Click the “Expected Data Sources” tab to view and manage the data types and corresponding data source types associated with any given fund.
The tab displays all available data types and the associated source type(s).

Fund “Expected Data Sources” tab -
Use the “Source Type” drop-down list for a given data type to select one or more expected data sources for that data type.

Source type designation for fund data types Specifying no source types for a given data type (i.e., leaving an empty “Source Type” box) denotes that there is no expectation for data of that type to be collected.
-
-
Click the “Fund Sleeves” tab to view and manage the sleeve(s) for any given fund.

Fund “Fund Sleeves” tab - To update the code and/or name of an active sleeve, enter the information in the corresponding fields for that sleeve.
-
To add a new sleeve to the fund, click the “Add another sleeve” link at lower-left of the “Active Sleeves” section on the tab, and then provide the sleeve code and name in the corresponding fields.
The sleeve code is used to ingest any data coming from this sleeve.
-
To deactivate one or more sleeves for a given fund, begin by clearing the “Is Active?” check box at right of each in the “Active Sleeves” section of the tab (subsequently clicking the “Save” button will prompt you to confirm the action).
-
Deactivating a sleeve has the following effects:
- The sleeve is listed among all other inactive sleeves in the “Inactive Sleeves” section of the tab.
- The “Sleeve Code” and “Sleeve Name” fields for the sleeve are disabled (i.e., cannot be edited).
Once you make a sleeve inactive, you cannot reactivate it.
-
-
-
- Click the “Save” button at upper-right of the screen to save your changes.
- Click “Back to fund overview” at upper-left of the screen at any time to go back to the list of funds.
Registrants
Click a registrant name on the “Registrant” tab to expand and view its associated fund listing.

You can edit the details of any given registrant by carrying out the steps outlined below.
-
Click the “Edit” button at right of the item.
-
You can update a registrant’s properties via the corresponding fields that display on the “Overview” tab.

Registrant “Overview” tab
-
- Click the “Save” button at upper-right of the screen to save your changes.
- Click “Back to fund overview” at upper-left of the screen at any time to go back to the list of funds.