Managing Form N-PORT Collected Data and Exceptions
You can review and manage data collected for form N-PORT on a fund-by-fund basis by using the “Data Received” link on the overview screen. In this mode of review, potential data validation exceptions within filings are highlighted so you can resolve or clear them.
Reviewing Collected Data
To review collected data for a given fund, click the “Data Received” link at right of that fund on the overview screen.
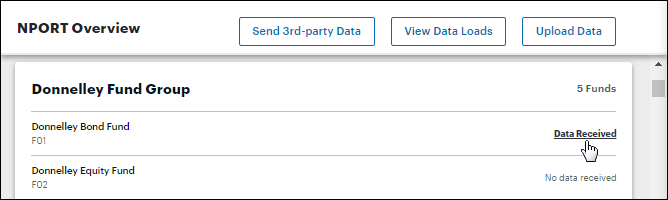
If no data has been received for a given fund, the overview screen will display “No data received” at right of that fund.
-
Clicking a fund’s name opens the “Sources” screen, which displays the name of the file that was loaded for each load type, as well as the status and time of file acceptance. For the initial release, the source file name will be auto-generated, and will be the same file name for each load type.
Clicking the “Data Received” link opens the “Sources” screen for the selected fund, which displays the name of the file that was loaded for each load type, as well as the status and time of file acceptance. The source file name will be auto-generated.
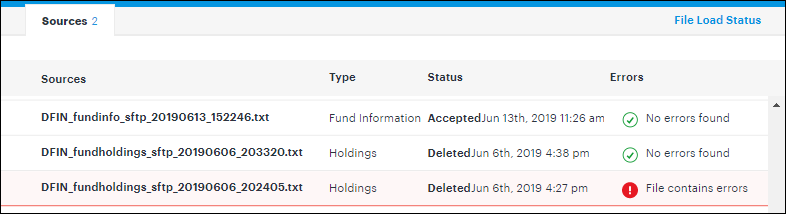
“Sources” screen file listing -
The number of errors for any given source, if any, is displayed in the “Errors” column. To view error information, click the red exclamation point in the row representing the source.
A dialogue opens to display the error details.
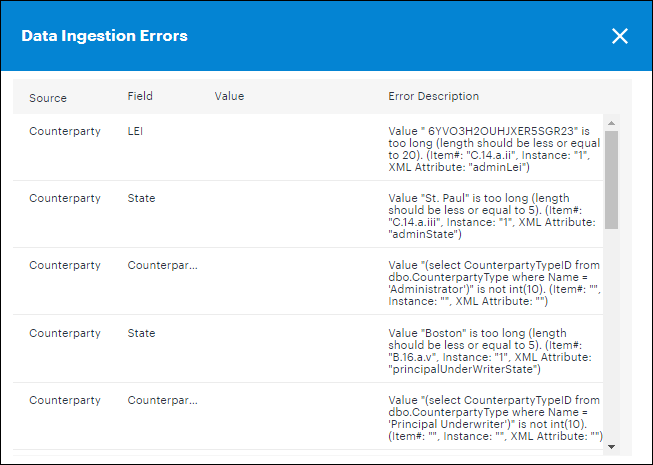
“Data Ingestion Errors” dialogue - Click the “x” button at upper-right of the dialogue to close the dialogue.
-
- Click “Back to previous page” at upper-left of the screen at any time to go back to the list of funds.
Purging Collected Data
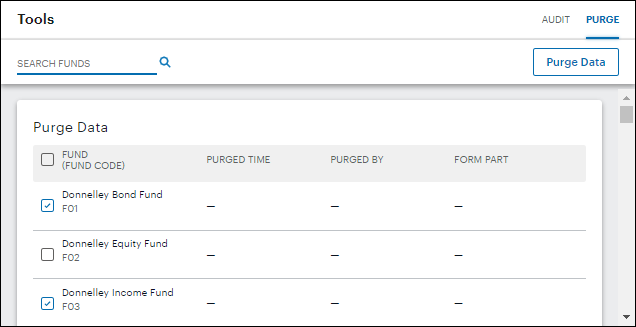
You can purge data for one or more selected funds via the “Purge” tab at upper-right of the “Tools” screen. To access the “Tools” screen, click the corresponding item in the side navigation panel.

Clicking the tab opens the “Purge Data” screen, which displays a line for all the funds in the fund group selected in the top-level navigation bar.
-
Select the check box(es) corresponding to the fund(s) to purge, for the account period selected in the top-level navigation bar.
- You can search for a specific fund via the search field at upper-left of the screen.
- You can use the “Select all” check box at far left of the grid header row to select all funds at once.
-
Once you have selected one or more funds, click the “Purge Data” button at upper-right of the screen. A dialogue displays, on which you can specify the part(s) whose values you wish to purge.
-
“Part B”
- You can purge the General Ledger values and Fund Sec Lending values.
-
“Part C & D”
- You can purge values for all of Part C and Part D, or for Reference Instruments and Repo Collateral individually or together.
-
“Part E”
- You can purge values for any explanatory notes set up in Part E.
-
- Once you’ve made your purge selections, click the “Purge Data” button on the dialogue to remove values for the selected account period.
-
After the dialogue closes, the following information will be displayed in the grid for each fund from which data was purged:
-
“Purged Time”
- Displays a timestamp of when the last purge took place.
-
“Purged By”
- Displays the name of the user who last purged data.
-
“Form Part”
- Displays the form part(s) in which the last data purge was completed.
-
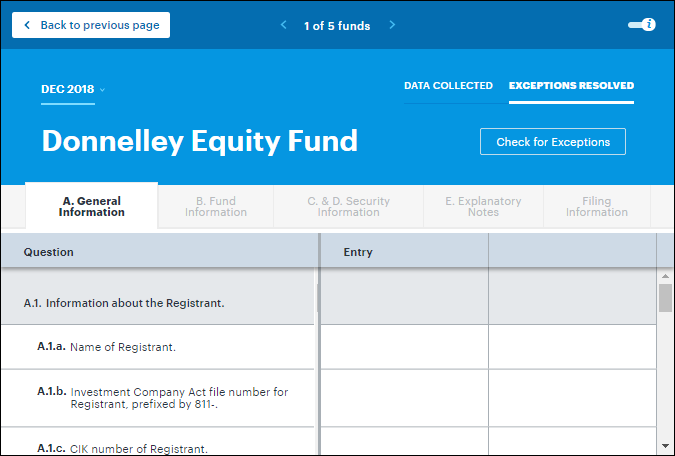
Reviewing Exception Data
You can review any exception data that exists in the selected account period for a given fund via the “Exceptions Resolved” screen. From this screen, you can edit values, run calculations, review risk metrics and roll forward values (Part B or Part C).
- Click the
 icon next to any item in each form part to be taken to the “Exceptions resolved” screen for the selected fund.
 -
Click the tab beneath the fund name heading that corresponds to the part of the form you want to review.
“Exceptions resolved” screen navigation -
To see detailed information about any given form question and its answer, click the value in the “Entry” column to reveal the info panel.
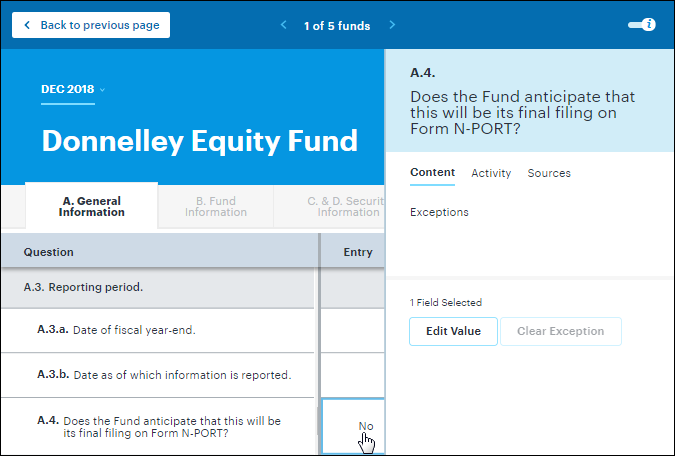
“Exceptions resolved” screen info panel, edit or clear -
Information pertaining to the question is distributed across various tabs in the info panel:
- The “Content” tab displays any exceptions that may exist for the selected item.
- The “Activity” tab displays an audit trail of any changes made to the selected item.
- The “Sources” tab displays the data source and value of the selected item.
- Fund holdings data can contain more than one instance of any holding by loading multiple records, and providing a value in the “BalanceInstance” field of the ingestion template. In this scenario you will see the value loaded to the balance instance appended parenthetically.
-
You can update a selected item’s value by clicking the “Edit Value” button at the bottom of the info panel.
-
Enter the desired value in the text box that displays at the bottom of the info panel, and then click the “Apply” button to effect the update.
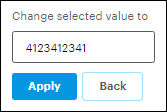
Info panel value update text box Click the “Back” button to cancel the update.
Security library items on the “C. & D. Security Information” tab display a “globe” icon in their column header text to indicate that changes made to this item will synchronize to other funds in the complex that hold the same security.
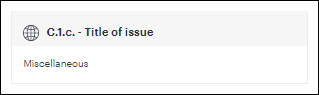
Security library item indication When you edit information for such items via the info panel, you will see a reminder that any changes made to the data element will be made globally (i.e., across the complex) for the same holding.
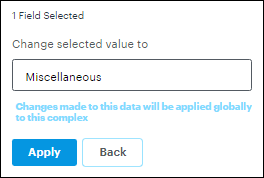
Info panel value update impact reminder
-
-
For certain N-PORT filing questions, information will be automatically rolled forward when data is ingested for the account period. However, you also have the option to manually pull values from the previous account period to populate the current filing by clicking the “Edit Value” button at the bottom of the info panel.
-
Specify whether to copy data for just the currently-selected question or for all questions, using the drop-down list that displays near the bottom of the info panel.
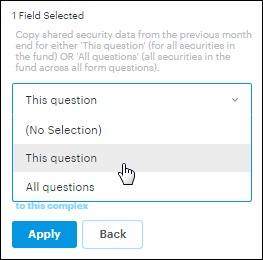
Info panel value copy scope selection - Selecting “This question” will pull values for the selected question only.
-
Selecting “All questions” allows you to pull the values for all questions in that part of the form that have pull-forward capability.
The “All questions” pull-forward functionality is executed independently between Part B and Part C.
-
Enter the desired value in the text box that displays at the bottom of the info panel, and then click the “Apply” button to effect the update.
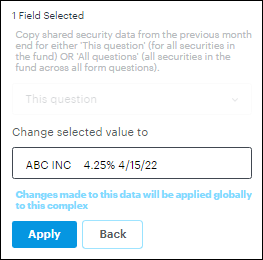
Info panel value update text box Click the “Back” button to cancel the update.
-
- Once the info panel is open, you can click any number of other questions’ values to view corresponding details.
-
Click any other tab, or click the info panel toggle switch at upper-right of the screen to close the panel.

Info panel toggle switch The toggle switch is “on” by default, but once you’ve closed the info panel using the toggle switch, you need to turn the switch back “on” manually in order to use info panel functionality again.
-
-
For questions in which multiple responses are permitted, you can manage the responses via controls in the question/answer headers.
-
Click the “Add New” button at right of a given question header in order to create additional instances of its answer.
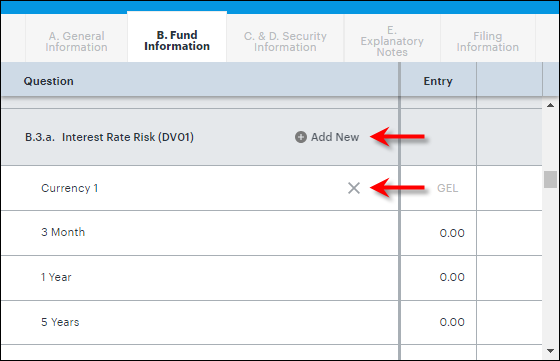
Multiple response management controls -
Clicking the button opens a dialogue containing all items associated with the referenced question.
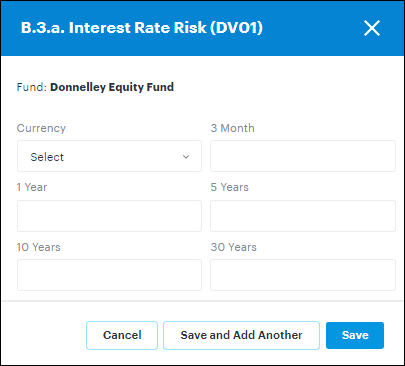
Add answer instance dialogue - Specify values for all the items, and then click the “Save” or “Save and Add Another” button on the dialogue to add the answer instance to the question. Click the “x” button at upper-right of the dialogue, or the “Cancel” button on the dialogue, to cancel the addition of the instance.
-
- To remove an existing answer instance, click the “x” button at right of its header.
Clicking the button opens a confirmation dialogue.
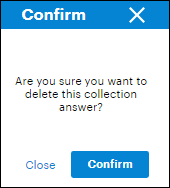
Remove answer instance confirmation dialogue - Click the “Confirm” button on the dialogue to remove the answer instance from the question. Click the “x” button at upper-right of the dialogue, or the “Close” button on the dialogue, to cancel the removal of the instance.
-
-
You can calculate values for specific questions by clicking the “Calculate” button at upper-right of the “B. Fund Information” tab, and then selecting the calculation(s) you’d like to run.
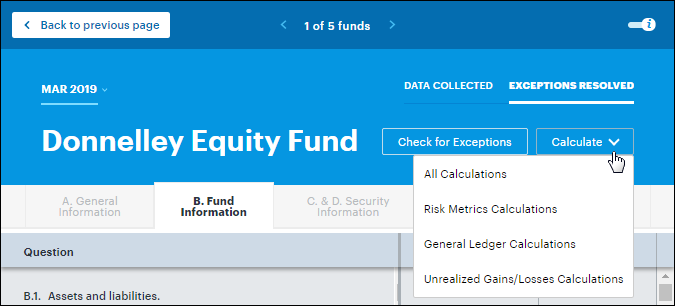
Fund Information “Calculate” button and drop-down list - Selecting “All Calculations” causes all available calculations to run (i.e., Risk Metrics, General Ledger and Unrealized Gains/Losses).
-
For question B.3, selecting “Risk Metrics Calculation” causes logic to be carried out to determine if the fund’s notional value of debt securities is above the 25% threshold (in which case an answer to the question is required for the fund).
-
If the fund is above the 25% threshold, calculations for specific filing questions and required time periods are performed.
-
Click the “View Calculation” link at right of the B.3 question text to review the 25% threshold calculation.
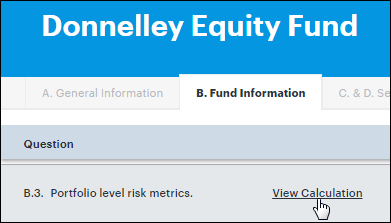
“View Calculation” link -
Clicking the link opens a dialogue containing the underlying values used to calculate the percentage.
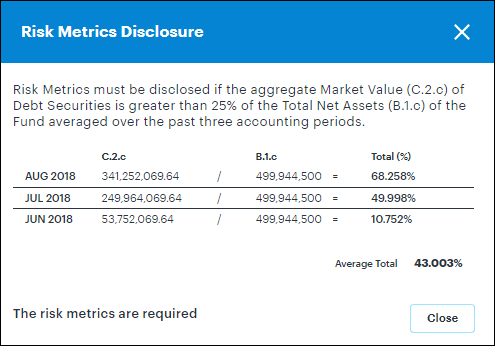
“Risk Metrics Disclosure” dialogue - A message is displayed at lower-left of the dialogue to indicate whether or not the risk metrics are required for the current fund.
- Click the “x” button at upper-right of the dialogue, or the “Close” button on the dialogue, to close it.
-
-
Click the “View Risk Data” link at right of a given time period for question B.3.a, B.3.b or B.3.c to review the underlying risk data used to calculate the risk values displayed.
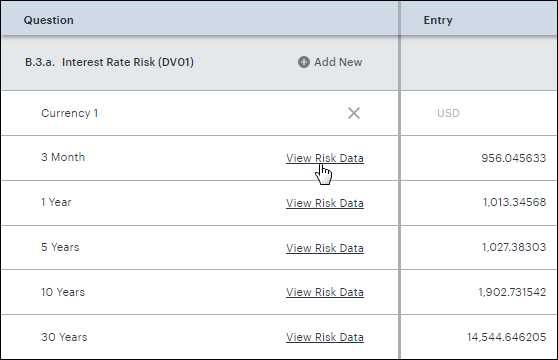
“View Risk Data” link -
Clicking the link opens a page that displays all the underlying risk data and the calculation used to determine the values.
Currently, the underlying risk values cannot be edited.
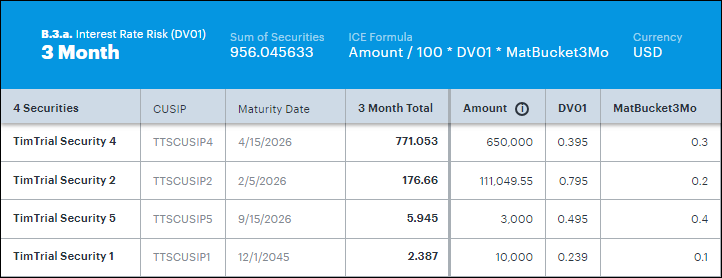
Risk data calculation page - Click “Back to Fund Information” at upper-left of the screen at any time to go back to the “Fund Information” tab.
-
-
-
Selecting “General Ledger Calculations” causes calculations for certain filing questions to take place, using GL balances that have been mapped to each respective question.
-
Selecting “Unrealized Gains/Losses Calculation” causes calculations for the unrealized values of certain filing questions to take place, based on the holdings for each respective question.
The change in unrealized values (B.5.c and B.5.d) is calculated by subtracting the sum of the prior period unrealized values from the sum of the current period unrealized values.
-
You can review security details via the “C. & D. Security Information” tab.
-
You can reduce the number of security records displayed via any of the following filter options at upper-left of the tab:
-
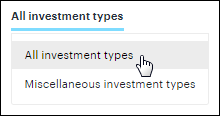
Investment type filter option - The “All investment types” view is selected by default.
-
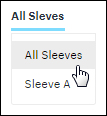
Sleeve filter option - This filter is for multi-managed funds that have set up and ingested sleeve-level data.
- The “All Sleeves” view is selected by default, but you can select an individual sleeve to display sleeve-specific data in the grid.
-
-
As needed, you can delete a security by following the steps outlined below.
-
Click the “x” button at right of the “Securities” column for the security record to be deleted.
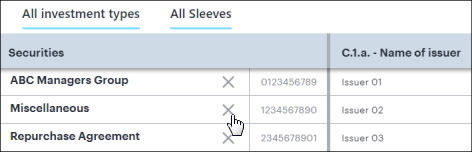
Security “Delete” option (N-PORT) - Click the “Delete” button on the dialogue that displays to proceed with the security deletion for the associated fund and account period combination. Click the “x” button at upper-right of the dialogue, or the “Close” button on the dialogue, to cancel the deletion.
-
-
-
To view additional levels of information that might be required for certain form items, you can click the item name, or the “Edit” button at its right.
Items that have the additional information are denoted by an underline, along with the number of additional items associated with that value, and a blue “Edit” button.
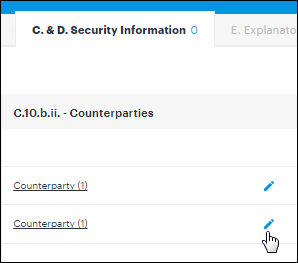
Security “Edit” button -
Clicking the item name or the associated “Edit” button opens a screen that displays the additional information.

Security detail editing
-
-
You can create or edit an explanatory note for any item that the SEC will accept via the “E. Explanatory Notes” tab.
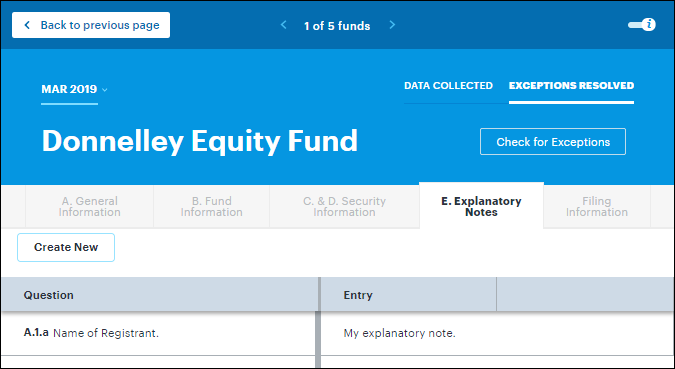
“E. Explanatory Notes” tab -
Clicking the “Create New” button at upper-left of the tab opens a “Create Explanatory Note” dialogue.
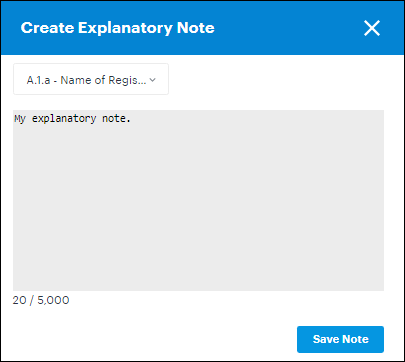
“Create Explanatory Note” dialogue - Select the question to which you wish to add the note via the drop-down list at upper-left of the dialogue.
-
Enter the note text in the text box.
There is a 5,000 character limit for each note, and a character counter is displayed below the text box.
- Click the “Save Note” button.
-
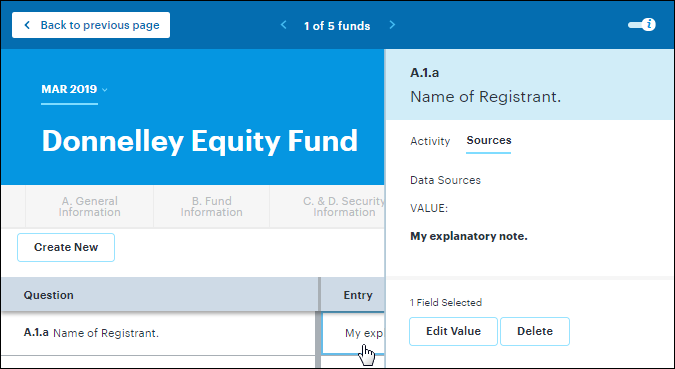
To edit the text of an existing explanatory note, click the value in the “Entry” column to reveal the info panel.
“Exceptions resolved” screen info panel, edit or delete -
Information pertaining to the explanatory note is distributed across various tabs in the info panel:
- The “Activity” tab displays an audit trail of any changes made to the selected item’s note.
- The “Sources” tab displays the value of the selected item.
-
You can update a selected item’s note text by clicking the “Edit Value” button at the bottom of the info panel.
- Enter the desired value in the text box that displays on the “Create Explanatory Note” dialogue, and then click the “Save Note” button to effect the update. Click the “x” button at upper-right of the dialogue to cancel the update.
-
You can delete a selected item’s explanatory note text altogether by clicking the “Delete” button at the bottom of the info panel.
- Click the “Delete” button on the dialogue that displays to proceed with the note text deletion. Click the “x” button at upper-right of the dialogue, or the “Close” button on the dialogue, to cancel the deletion.
-
-