Side Navigation Panel
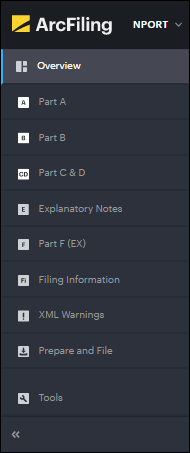
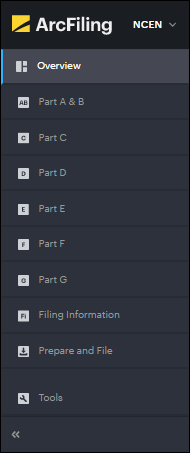
You can quickly access the values for specific parts of forms N-PORT and N-CEN via the navigation panel at left of the screen. By default, the panel is open when you sign in and land on the overview screen.


You can hide or show the panel via the collapse/uncollapse button at lower-left of the screen.
The side navigation panel contains the following clickable links to corresponding parts of each form.
-
Form N-PORT
-
“Overview”
- Displays an overview of whether or not data was collected for the account period, complex and fund group(s) selected in the top-level navigation bar.
-
“Part A”
- Displays the values for all items in Part A.
-
“Part B”
- Displays the values for all items in Part B, which can be accessed via the various links of the sub-panel at left of the screen.
-
“Part C & D”
- Displays the values for all items in Part C and Part D, which can be accessed via the various links of the sub-panel at left of the screen.
-
“Explanatory Notes”
- Displays any explanatory notes loaded via the ingestion template.
- Allows you to manually add, edit and delete explanatory notes for each question in the form.
-
“Part F (EX)”
- Allows you to attach documents for Part F, which is part of the N-PORT-P filing.
-
“Filing Information”
- Displays values for each question on the “Filing Information” tab, which can be accessed via the various section links of the sub-panel at left of the screen.
-
“XML Warnings”
- Allows you to check for any XML violations once data has been loaded.
-
“Prepare and File”
- Allows you to generate XML, download XML/Excel renderings and perform test, live and amended filings of form N-PORT.
- The XML generation, download and filing tasks can be completed for more than one fund at a time, and you can view and download historical XML that was generated and filed.
-
“Tools”
-
“Audit”
- Allows you to run the audit history of changes made to values for the account period selected in the top-level navigation bar.
-
“Purge”
- Allows you to purge values for items in Part B, Part C & D and Part E for the account period selected in the top-level navigation bar.
-
“Consolidated Report”
- Allows you to run a report that contains a summary of all the data loaded for the selected account period.
-
-
-
Form N-CEN
-
“Overview”
- Displays an overview of data collected for all registrants you have access to, for the account period selected in the top-level navigation bar.
- The overview gives a status regarding the receipt of data, the status of the filing (not started, in progress or filed) and the series being filed within each registrant.
-
“Part A & B”
- Displays the values for all items in Part A and Part B, which can be accessed via the various links of the sub-panel at left of the screen.
-
“Part C”
- Displays the values for all items in Part C, which can be accessed via the various links of the sub-panel at left of the screen.
-
“Part D”
- Displays the values for all items in Part D, which can be accessed via the various links of the sub-panel at left of the screen.
-
“Part E”
- Displays the values for all items in Part E, which can be accessed via the various links of the sub-panel at left of the screen.
-
“Part F”
- Displays the values for all items in Part F, which can be accessed via the various links of the sub-panel at left of the screen.
-
“Part G”
- Displays the values for all items in Part G.
-
“Filing Information”
- Displays values for each question on the “Filing Information” tab, which can be accessed via the various section links of the sub-panel at left of the screen.
-
“Prepare and File”
- Allows you to generate XML, download XML/Excel renderings and perform test, live, and amended filings of form N-CEN.
- The XML generation, download and filing tasks can be completed for more than one registrant at a time, and you can view and download historical XML that was generated and filed.
-
“Tools”
-
“Audit”
- Allows you to run the audit history of changes made to values for the account period selected in the top-level navigation bar.
-
-
For details about navigation, filtering and other options available for each part of the forms, see the “Managing Form Data” section of this documentation.